SU Carburetors are very new to me. I've never dealt with them. I've heard of those that hate them and those that love them and would never change. Jury is out.
That little hole you see here is aligned such that fuel will spit directly onto the exhaust manifold if the bowl over flows, which it did, rather profusely.
The culprit is this guy right here. The pivot is worn through! This will not due! Ordered anew :)
Making our house a home, one project at a time. With no money, no time, and a little skill.
Monday, October 25, 2010
Amazon Electrical
I received my alternator bracket in the mail the other day. I've decided to go with the GM style two wire alternator due to it's relatively inexpensive and I can find one anywhere on the planet. The "kit" comes with a wiring diagram, bracket and a list of instructions.
Pretty strait forward, Installed if a few times to make sure that the alignment was good.
With the belt aligned I hooked up the electrical. This was the last step before giving my car the first start-up in 10 months.
She started just fine. Shut down due to a fuel leak from the carburetor but she did run.
Sunday, June 20, 2010
Transfixed
So as soon as I found out that some goober had ruined the threads that retain the speedometer pinion I had to fix it. This feature resides in the rear main bearing housing for the transmission and pretty much requires full disassembly of the transmission. OK no problem.
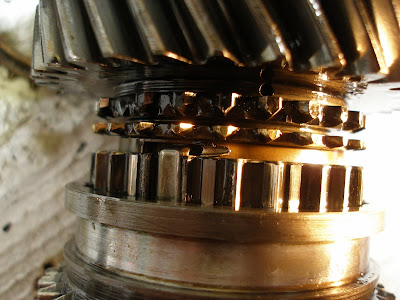
This picture shows the 1st gear synchro where you can clearly see some damage.
Here is a shot of the synchro pulled out with the bad dog (the bar on the left of the screen). That notch is not supposed to be there. The piece was pulverized by the gnashing gears of the transmission. About 2 hours for disassembly. Now that I've done this and have a couple new tools, this should take about 30 minutes.
About $150 worth of parts and six hours later I have a rebuilt transmission. Another hour later I had it installed in the car. This is a major step toward getting the car out of the garage.
The transmission is installed in the car, prop shaft bolted on, new mounts and cross member installed. Tomorrow I'll install the clutch slave cylinder, starter motor, bleed the brakes and take her off of the jack stands for the first time since she went into the garage the first of the year.
Sunday, June 6, 2010
Parking Strip - Weed Farm
What to do with that strip of land between the sidewalk and curb in front of your house? Well mine is a haven for weeds and, again, cat poo. The weed barrier was showing through in some spots and generally looked like hell.
Executive decision! Saturday I started to scrape off the top layer of dirt, poo, weed chaff & whatnot. Starting to look good you say? Yes I would agree. Of course J says I need to take the level down about 3" from here - oy my aching back. But lowering the grade will help with sidewalk runoff.
Sunday morning we wake to rain, torrential downpour, monsoon? Well at least it's a warm rain. Welcome to the mud flats of St Johns.
This strip is belongs to the City of Portland and they are particularly vague about what is and is not allowed to be placed here. Garden boxes you say? Well that's OK unless a neighbor complains about it and you might be on the hook for fines up to $1000/day. Are trees OK? An Oregonian article from earlier this year sheds a little light, or shade, in this area. I love tree lined streets even though the sidewalks suffer from root lifting and the home owner is responsible for the maintenance of a tree that benefits all on the street. The Portland Green Streets Program is great but it's pretty much reserved for professionals.
So no permanently installed structures, anything placed in the strip must be <3' tall and portable. Sand set pavers may be installed without permit provided you stay <50% of the strip area, yadda yadda yadda....
Maybe the weeds weren't so bad after all.
Sunday, May 30, 2010
Gatos del vecindario
This is the window for our bedroom. Nice isn't it? I certainly think so.
Yes - it is exactly what you think it is and its right under the window shown above.
It's not so much that I hate cats, I don't. I just don't like that it's generally accepted that cats are allowed to run free throughout the neighborhood.
I cannot stand cat s*&t in my yard in general but directly under my window.... come on! We'll have that window open all summer long and the aroma from a freshly laid dooky is indescribable. The picture above is 1" hardware cloth, snipped and bent to make a carpet of standing spikes that will, I hope, will deter the little kitties.
This is the installed carpet. It is only about 6" wide so it doesn't cover everything that I'd like to cover so I may have to add more area.
Strategies others have used: Blender Defender, Motion Detector Sprinkler, Auto-Targeting Paintball Gun - I really like this one! Do you think Jacq will let me have it?
Sunday, May 16, 2010
850 Glove Box
The glove box in Jacq's car broke about a month or two after we bought the car. It's repair was on my list now for six months (?) or so. I didn't worry about it because the glove box was closed and it looked OK closed. But while the car was in the shop last week, the wheels needed to be removed and the special lug nut wrench was inside the glove box. We told them to go ahead and hack the latch to get the door open and retrieve the special tool. This would have been a real pickle had she been on a trip and gotten a flat. Anyway - got around to fixing it today.
The pin in the circle had broken off.
Broken pin that I pulled out. This part is just cast and is not very strong.
A couple quick measurements and I came up with a game plan. The latch that was hacked out has the same (close enough) diameter as this pin. I drilled out the location of the broken pin then pressed in a section of the latch wire cut to size. The extra length to the right is not a problem as there is nothing there anyway.
I ordered a replacement latch from PartsGeek.com for about $6.00 that should be here later in the week sometime and the project will be finished.
Saturday, May 8, 2010
Refer Madness
The other day I got home to find J clearing out the fridge. I ask her what's going on and she tells me that it is 60 degrees in there and apparently not working. I jump into troubleshooting mode. I futz with this and that but nothing is readily apparent. I check the web for info, finding some good and some crap.
I'm wary of appliance repair people (persons?) in general ever since I saw a report about appliance repairmen that gouge you. Appliance repair is seemingly a black art but it's just switches, timers, motors and the like so what's the mystery?
Well I was about stumped in this endeavor until I had a chance to peruse the electrical schematic stuffed inside an interior panel. Then it dawned on me! The freezer fan isn't running at the same time as the compressor fan. I check line voltage at the motor connector - 120V good => motor shot.
I found some information on the web for the motor that I pulled out and I was able to cross reference it to 5 other motors. Time to make some calls. A couple places in town that are supposed to be appliance part distributors and they would only give me the OEM fan for $85, $101 & $105 - that's way too much! I call a guy down at Ankeny Hardware on SE Stark & 11th and he was able to cross my motor to an aftermarket one. Yeah!
After about 30 minutes working with the guy at the hardware counter, we got the correct motor. The great thing about his particular motor is that it's reversible and I can make it turn in the direction that I need for this application.
I installed the new motor and fan blade. Of course, it's going in the wrong direction. Quick fix and I reassembled the refrigerator and it works. We closely watched the temperatures and adjusted as needed. Freezer at 0 degrees and fridge at 38.
Sunday, February 21, 2010
Attic Electrical - Just adding a switch....
We have a foreign exchange student coming to stay with us for two weeks late in March (around J's B-Day) and we plan to have her stay in the extra room upstairs. Until now, the only light in this room was a pull chain in the center of the room. Well, when it's dark, it's kinda hard to find so we decided to put in a switch at the bottom of the stairs. Nice 3-way switch so you can turn on the light from the top and bottom of the stairs. Easy, right...?
Well not so much when your house is 87 years old with knob and tube wiring. If you don't know much about knob and tube consider yourself lucky, as it's pretty scary stuff. This particular circuit just happens to run up the south wall all the way to the peak of the attic, across the entire house and down the the outlet under the window. Along the way it somehow picks up the ceiling lights/fans in D's room, the bathroom, the hall, our room and the living room. We're not done yet... it also has the two outlets on the mantle (where our stereo is plugged in) and the only two outlets upstairs - well, that's a bit much - OY!
The logical starting point is the 2 foot wide section in the center of the ceiling. This was a real treat. Taking off the panels and exposing 50+ year old insulation. Yuck. BTW you should never, absolutely ever, insulate over knob and tube wiring.
I think J was getting a bit nervous when she saw the ceiling panels removed. One leg of the knob and tube wiring went to the left of the window and the other to the right so I decided that I had to expose the end wall too. Quite a mess!
What's left of an outlet that really didn't work anyway. See what I mean - scary....
D wanted to help during the reconstruction phase. She helped install trim, wire up the outlets and the dimmer switch and helped clean up a bit. She learned some basic home wiring and safety to boot!
Thursday, February 11, 2010
The more I tear into the car the more I find to fix (go figure). I saw a hornets nest in the headlight bucket and the headlight was aimed a bit weird so I worked on it. All 4 screws broke off...... now I have to drill and extract them without damaging the body nut.
I've installed the new IPD timing cover with neoprene seal - very nice indeed. I'd certainly like to ensure that I eliminate as many oil leaks as possible before making this a daily driver.
Status so far...
* Replaced timing cover
* Started tracing out electrical issues and repairing as I find them. Mostly bad end and but connections.
* I tried to replace the oil sump gasket but I have to either remove the transmission or pull the engine completely out. I lifted it but the oil pump and the frame cross member prevents removal. DOH!
* I pulled out the front seats and started working on electrical under the dash
* While under the car I found that the suspension bushings are completely shot and some are missing... IPD to the rescue....
* When I bought the car it came with dual SU carbs installed. It also came with Stombergs AND with the Weber DGV kit (this kit is valued at nearly $600!). Since dual carbs can be a pain to get and keep tuned, I'll rebuild the Weber and install the kit.
Sunday, January 24, 2010
New project - 122 Amazon Wagon
So I'd been looking on and off for a while for a replacement for my Pontiac. I found a Volvo 122s Wagon where the body is in pretty good shape. The previous owner had blown the B18B engine that was original to the car and replaced it with a B20B from a 144. Nice upgrade, more power.
I don't really trust work done by others (aside from the fact that nearly every nut, bolt and screw on this car is lose) when it comes to mechanical work. I'm going through the critical systems, engine, ignition, brakes, engine wiring, suspension, etc to make sure that all is good. I'm going to check out he oil and water pumps, adjust valves & replace gaskets and hoses.
This weekend I adjusted the valves. Cold should be 0.50mm to 0.55mm (go/no-go) most of the valves were in the range of 0.95 to 1.05mm - pretty far out. This should bring them back in line.
Next - gaskets & hoses then I'll drop the oil sump for some inspection.
Subscribe to:
Posts (Atom)